CSS Selectors Practice

Here’s a simple HTML and CSS example for learners to practice using various CSS selectors. The HTML has multiple elements with different classes, IDs, and tags so learners can practice targeting them in different ways.


HTML (index.html)

<!DOCTYPE html>
<html lang="en">
<head>
  <meta charset="UTF-8">
  <meta name="viewport" content="width=device-width, initial-scale=1.0">
  <title>CSS Selectors Practice</title>
  <link rel="stylesheet" href="styles.css">
</head>
<body>

  <header id="main-header" class="header">
    <h1>Welcome to CSS Practice</h1>
    <p>Get comfortable with different selectors!</p>
  </header>

  <section class="content">
    <h2>About CSS Selectors</h2>
    <p class="highlight">CSS selectors let you target HTML elements to style them in various ways.</p>
    <p>Selectors are a fundamental part of CSS.</p>
  </section>

  <section class="gallery">
    <h2>Gallery Section</h2>
    <div class="image-container">
      <img src="image1.jpg" alt="Image 1" class="img-thumbnail">
      <img src="image2.jpg" alt="Image 2" class="img-thumbnail">
    </div>
  </section>

  <footer>
    <p>Contact us at <a href="mailto:info@example.com">info@example.com</a></p>
  </footer>

</body>
</html>

CSS (styles.css)

This CSS file is mostly empty to allow learners to practice writing CSS selectors.

/* Start styling here */

/* Example selectors */

/* Type selector - Selects all paragraphs */
p {
  font-size: 16px;
}

/* ID selector - Selects element with ID "main-header" */
#main-header {
  text-align: center;
}

/* Class selector - Selects all elements with the "highlight" class */
.highlight {
  background-color: lightyellow;
  padding: 5px;
}

/* Descendant selector - Selects all <img> elements within a container with the "gallery" class */
.gallery img {
  width: 100px;
  height: auto;
  margin: 5px;
}

/* Universal selector - Applies to all elements */
* {
  box-sizing: border-box;
  margin: 0;
  padding: 0;
}

Practice Exercises

By practicing with these selectors, learners will become familiar with targeting elements in different ways and using various CSS techniques for layout and styling.

You'll find the previous CSS code in our Code Pen, click on the link, type the correct code into the CSS. When you fix all the errors the render window should look the following screenshot.
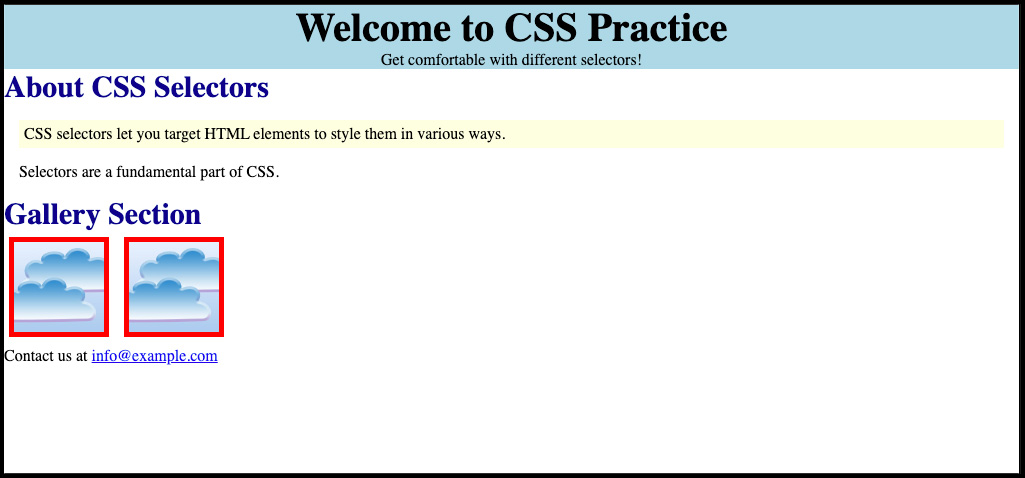
Screenshot of codepen.io

Here are the instructions:

  1. Type Selector: Change the color of all <h2> elements to darkblue.
  2. Class Selector: Add a border to elements with the img-thumbnail class.
  3. ID Selector: Center the text in the main-header section and set a background color.
  4. Descendant Selector: Set a margin of 15px around each <p> in the content section.
  5. Pseudo-Class Selector: Change the color of links when hovered over.
  6. Universal Selector: Set box-sizing to border-box for all elements.

In order to complete this assignment, you'll need to know how to screenshot your computer. (I know y'all can do that on your phones, I've see the receipts...) let's make sure you can do the same on your computer.

Screenshot on a Mac

In order to take a screenshot on your Mac:

  • With the dialog or window you'd like to screen shot visible on your monitor, press command (⌘) + shift (⇧) + 4.
  • Draw a marquee around the portion of the display you'd like to screen shot.
    OR
  • Press the space bar and then click on the window you'd like to screenshot. (This only works on an open window or dialog. The OS helps you by "graying out" the window when you hover over it.

Screenshot on a PC

In order to take a screenshot on your PC:

  • With the dialog or window you'd like to screen shot visible on your monitor, press Windows (&x229e;) + Shift (⇧) + S.
  • Draw a marquee around the portion of the display you'd like to screen shot.
  • After capturing the screenshot, a thumbnail will appear in the bottom right corner of the screen.