The LightBurn software interface is divided into multiple functional panels and toolbars that help you design, edit, and control laser cutting jobs. This page introduces the key components of the interface to help you get oriented.
Main Interface
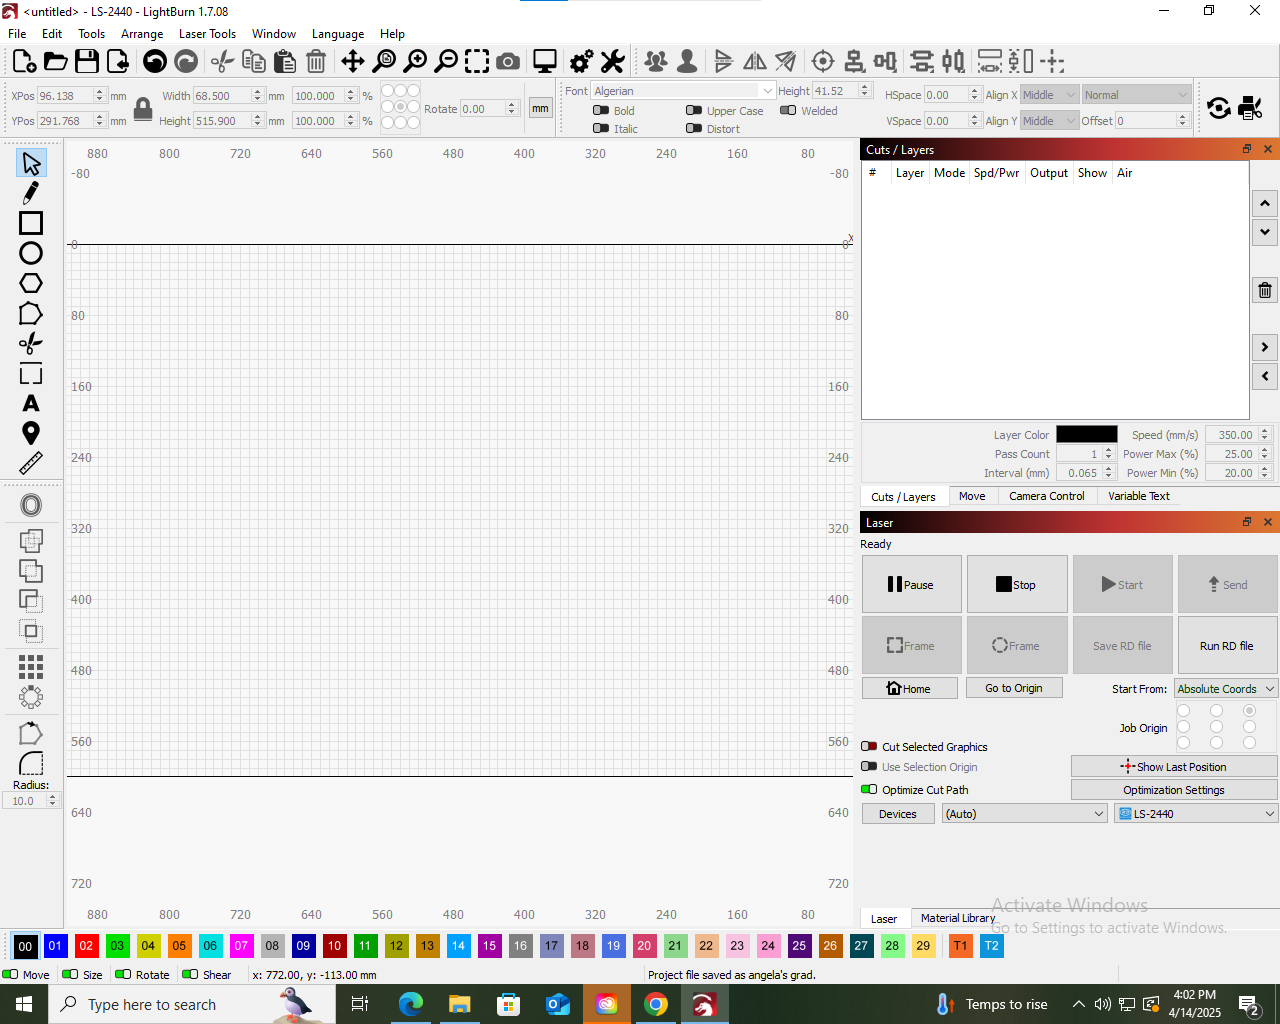
The main LightBurn window consists of a drawing canvas in the center, surrounded by tools and control panels. On the left, you’ll find the drawing tools; on the right, you’ll find layer settings, laser controls, and more; across the top, you'll find the ribbon and the control bar; along the bottom you'll find the 32 layers that you can program for different laser settings.
Toolbar and Control Bar
The top of the interface includes the main toolbar and control bar. Here, you can perform tasks like saving your file, zooming in or out, undoing actions, and switching tools for selection, drawing, or node editing. Hovering over each button will show a tooltip describing its function.
Cuts and Layers Panel
On the right side of the screen, the Cuts / Layers panel lists every layer you’ve defined in your design. Each color corresponds to a different operation like cut, score, or engrave. You can adjust speed, power, and the number of passes for each layer. Double-click a layer to access its detailed settings.
Notice that under the Mode column, there are Image layers and Line layers. These are LightBurn's terms for raster/bitmap images and vector images respectively. Anything on a Line layer is set to cut through the material and anything on an Image layer is set to etch the material.
You can change these settings by using the drop down menu shown on the Line layer in this image.
Take note that the laser settings for the selected layer are located at the bottom of the panel, so you can make adjustments without opening the Cut Settings Editor (see next section).
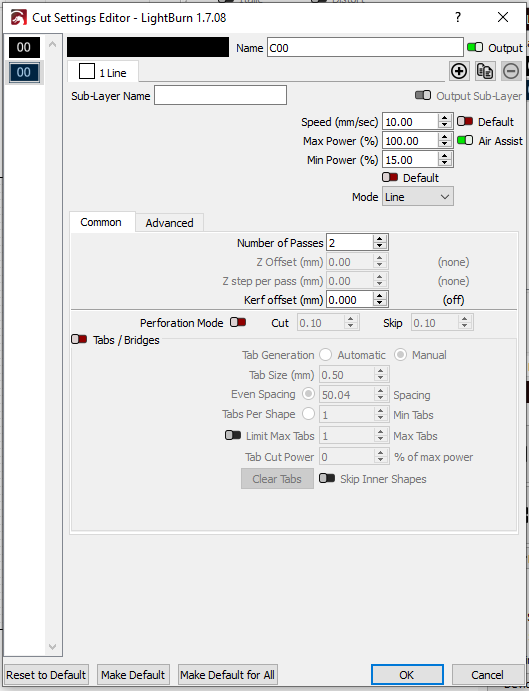
Cut Settings Editor – Cut
This dialog lets you configure precise parameters for a cutting layer, including:
Speed: How fast the laser moves across the material. Lower speeds are typically used for deeper cuts.
Power: The percentage of the laser’s total output. Higher power means deeper or darker burns.
Number of Passes: The number of times the laser will trace the same path. Multiple passes can cut thicker material or reduce charring.
Mode: Select whether the operation is a Line (cut), Fill (engrave), or Fill+Line (both in one step).
Kerf Offset: Adjusts for the material removed by the laser beam. Use this to fine-tune fitting parts together in tab-and-slot construction.
Perforation Mode: Allows the laser to alternate between on and off as it moves, creating a dashed cut line. You can set the cut and skip lengths (e.g., 0.2 mm cut, 0.2 mm skip).
Z Step Per Pass (if enabled): Allows slight bed adjustments between passes, useful for cutting thicker materials in stages.
Overscanning: Adds extra movement beyond the fill edge to ensure consistent burn when decelerating. Especially helpful for Fill operations.
Always test your settings on a scrap piece of material before committing to a final cut. These settings directly impact quality, safety, and material efficiency.
Cut Settings Editor – Etch
Etching (or engraving) settings allow you to adjust resolution (DPI), image mode, contrast, brightness, gamma correction, and more to fine-tune how your image will be rendered onto a material.
Speed: How fast the laser moves across the material. Lower speeds are typically used for deeper cuts.
Power: The percentage of the laser’s total output. Higher power means deeper or darker burns.
Number of Passes: The number of times the laser will trace the same path. Multiple passes can cut thicker material or reduce charring.
Mode: Select whether the operation is a Line (cut), Fill (engrave), or Fill+Line (both in one step).
Image Modes define how LightBurn converts pixel data into laser movement. The most common modes include:
Dither (Atkinson, Floyd-Steinberg, Jarvis, Stucki, etc.): Uses dot patterns to simulate grayscale. Great for photographs and fine gradients.
Threshold: Converts the image to strictly black and white, no grayscale. Useful for line art or logos.
Grayscale: Maps pixel brightness directly to laser power. Best for smooth shading but requires careful tuning.
Negative Image: Inverts the brightness values in your image. Useful when burning onto dark materials where you want white areas to burn darker.
Pass Through: Disables all LightBurn image processing. This is used when you've already pre-processed your image (e.g., using an external dithering tool like Imag-R or Photoshop) and want LightBurn to engrave it exactly as-is. DPI must match your external file settings.
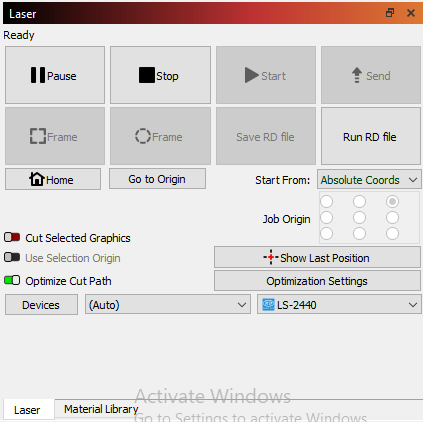
Laser Control Panel
Before starting your job, use the Laser Control panel to check your device connection, set the job origin, and run a framing preview. When everything looks good, click Start to send the job to the laser cutter.

![LightBurn Cuts and Layers dialog box [2 layers]](images/LightBurn_cutsLayers02.png)
![LightBurn layer settings dialog [etching]](images/LightBurn_settingEtch.png)